Reply With Quote
Hi Tonks
Please pm your email and I can take some photos during the week and send them on. Ripples

dnej what a top class job , you done well there mate.
cheers Hilly


Hi Tonks
Please pm your email and I can take some photos during the week and send them on. Ripples


Unreal there dnej, with the higher sides as well you,ve turned it into a totally different boat. Those old stessl's were built well.


dnej ; in your 1st pic with the good ole Mariner ( love those motors) how did it change the behavior of the ride with outside pods compared to without the pods?
I 'd like to have them for a few reasons like getting line off the prop, boarding, floating the rear better to make it a bit more stable and of coarse havin a leak, did a following swell affect it? or any other bad habits? I can't go full pod because the boat "just" fits in it's parking area, Thanks
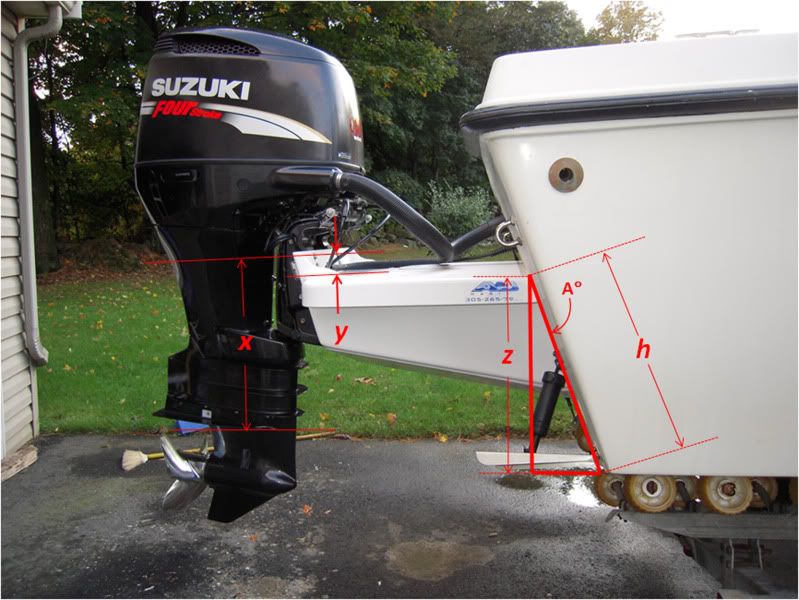
Please use the picture below to follow along with this description.
Ultimately we want to figure out the distance labeled h. This value is the distance from the point of the keel to the top of the bracket deck as measured directly on the surface of the transom. Figuring this distance is complicated by the height adjustment for the motor required by the offset from the transom by the bracket and the transom angle.
The rule of thumb I used to get the ball rolling is: The cavitation plate on the motor lower unit needs to be 1 higher than the keel for every foot of bracket set-back. Keep in mind that this is a rule of thumb, different hull shapes may need slightly more or less adjustment of the cavitation plate location. This can be addressed later on by choosing different mounting holes on the outboard.
First we have to locate the cavitation plate relative to the keel, motor mounting holes and bracket mounting holes:
On the outboard, measure the distance x from the top of the cavitation plate to the center of the middle mounting hole on the outboard. From the distance x, subtract the distance y measured from the center of the mounting hole on the bracket to the top surface of the bracket deck.
If you add the height adjustment that you calculated from the rule of thumb you will end up with the distance z. The distance z is the location of the top of the bracket deck relative to the keel of the boat.
(x-y) + (offset height adjustment) = z
Because the transom is angled, you cant directly transfer z to the transom. You have to take into account the angle, A. If you sort through the cobwebs in your skull that used to be your knowledge of high school geometry you will remember that the cosine of angle A is equal to z/h. If you rearrange the equation to solve for h you end up with:
h = z/cos A
There is a very easy way to measure the angle A that uses a standard carpenters square. Click on THIS LINK for instructions.
Once you have the value of h you can just slap a tape measure on the transom and mark off the spot where the top deck of your bracket needs to be located on the transom.
I got lucky and the rule of thumb worked out perfectly. Chances are once you get it all set up and sea trial the boat you will need to go up or down a bit using the motor mounting holes. The goal is to get the cavitation plate riding at or just above the surface of the water when the boat is on plane.
__________________

Hi there
Nice explination does take all the guess work out of it and the rules of thumb and black art!
By the way your link = 'This Account Has Been Suspended'
Cheers
Chimo
What could go wrong.......................
 Posting Permissions